Friday 23 December 2022

THC CBD COCONUT OIL

 THC COCONUT OIL RECIPE

This recipe is Vegan friendly.

I'm writing this on my phone so there is not an option for photos. I will update when I'm around a computer.

I have been using this recipe for years. It was my Father's recipe..yet tweaked a bit over the years as it has never been written down.

WARNING ⚠️ 
     
I have had my medical Marijuana card and a license to grow in Canada for a few years now. If Marijuana is not legal where you are and you are not licensed then I do not recommend that you break the laws. Try smaller amounts to start.
A beginner should make this with about 1 ounce Marijuana and use approximately 1 teaspoon of finished product per serving.
Increase or decrease as needed.

This Coconut oil can be eaten as an edible by itself or as a butter/margerine/oil replacement in many different recipes.

Treat
*Sleeplessness (Indica)
*Anxiety 
*Depression 
*Pain
*or Just for the giggles 

It can also be used as a topical massage oil for aches and pains due to many ailments.

*Arthritis
*Fibromyalgia
*Cramps
*Muscle aches

Allow 30 minutes to 1 1/2 hours after consuming or topical for effects to take place.
For topical(applied on skin) be a bit more generous, but be aware that you can become high from topical usages.

Needed

-Slow cooker

-Cheese Cloth

-Spoon

-Oven Mitts

-Gloves(Optional)

-Small Jars(I bought mine from a dollar store) 

Ingredients 

-1 to 4 ounces Marijuana 

-1.6 litres Coconut Oil

-1.6 litres Water

For years I have toyed with my recipe. Always ending with a slightly new result, perfecting it as I go. As I learn to perfect it.

Directions

Part 1:

Put your Coconut oil and water into your slowcooker on low heat. Let the oil melt. Try not to allow it to boil.

Part 2:
 
Break up your dry Marijuana. I use 1 to 4 ounces, depending on how strong I want my oil to turn out. 
Cut your cheesecloth into generous squares(double it up). Place your Marijuana into the cheesecloth squares and wrap it into a ball. Tie the end with a piece of cheese cloth. Making 'teabags'.
You can toss the Marijuana right into the oil/water but it will be alot more work to strain and separate the leaves later.

NOTE: You can make it stronger using more Marijuana. If it turns out too strong you can simply add more Coconut oil later.

Part 3:

Toss your *teabags* into the oil/water mixture in your slowcooker. Allow to cook for hours. I usually set mine to 6 hours to start.
Watch it.
Stirring occasionally. 
If it starts to boil turn heat off or remove lid to allow cooling. You can cook at low heat for 6 to 12 hours. You can easily allow to cool awhile then warm it up again.

Part 4:

Allow mixture to cool to touch(still warm). Remove your *teabags* from mixture. Squeeze the oil from them(using gloves if you don't wish to get high). I rinse the teabags after with just boiling water(just enough to soak the excess oil from the teabags), squeezing the remaining oil out. I then add the water to the slow cooker.

Part 5:

Put the slower cooker full of mixture in a cool, dry place with the lid on top. Allow oil to separate from the water and become solid.

Part 6:

Pull the solid chunk of oil out. Set aside in another dish. Discard the water. I personally would not use the water for anything other than fertilizer. 

Part 7:

Clean the slow cooker.
Then put the thc oil back in. Turn it to low, only allowing the mixture to melt again.

I then pour the mixture into my jars using my measuring cup or a soup spoon. Place lids on jars.

Part 8:

Place the Jars of oil in a cool, dry place. Allow oil to harden. It should appear to be light green in color.
Label your jars with:

*Warning THC
*Adults only(Not for children)
*Thc Coconut Oil
*Date

This recipe can be used for pain remedies,  medicinal, gifts for adults that also use medicinal Marijuana products.
Dress up the jars. Labels. 
Make your favorite delicious edibles by swapping Marijuana, butter, or oil with your thc coconut oil mixture.

Keep away from children and animals! 


Wednesday 25 April 2018

Husbands Who Will Buy Their Wives Yarn Today

Husbands who will buy their wives yarn today Tim, John, William, James, Charles, Walter, Liam, Daniel, Jacob, Robert, David, Michael, Ethan, Shane, Kyle, Nathan, Ryan, Jake, Hugo,Simon, Chris, Stephan,  Andrew, Paul, Justin, Thomas, 
Austin, Curtis, Blaine and Gary.


Check out all the free classes Craftsy has to offer.


Craftsy Unlimited FREE 7 day trial at Craftsy.com


Easy Pillow Boxes

 Beverage Cozy Mitt

 Twist and Shake Square

 Passionately Pink Purse


Sunday 4 February 2018

Easy Pillow Boxes


http://www.niftynnifer.com/2018/02/how-to-make-pillow-boxes.html

We Used:
Paper Rolls.
Glue (I used hot glue).
Buttons.
Coloured paper or construction paper.
Googly eyes.
Ribbon.
Stickers.
Scissors.
Candy.

Instructions:

Fold in one side of the tube.
Flip tube over and fold the other side in the same way.


http://www.niftynnifer.com/2018/02/how-to-make-pillow-boxes.html

Cut a piece of paper to evenly fit around your tube.
Wrap the paper around the tube. Glue one end to the back of your tube. Lap the other end of the paper over the glued edge. Glue in place. 


http://www.niftynnifer.com/2018/02/how-to-make-pillow-boxes.html

Add your stickers. Glue on your googly eyes or buttons.
For the owl we simply cut out wings, beak and eyes from coloured paper.

Open one end of your box to insert your candy or gift.
http://www.niftynnifer.com/2018/02/how-to-make-pillow-boxes.html

Make sure your ribbon is cut long enough to fit around your box. Tie the ribbon around the box to finish.


http://www.niftynnifer.com/2018/02/how-to-make-pillow-boxes.html

Here's a pillow box we made for Valentine's Day!

http://www.niftynnifer.com/2018/02/how-to-make-pillow-boxes.html


Monday 29 January 2018

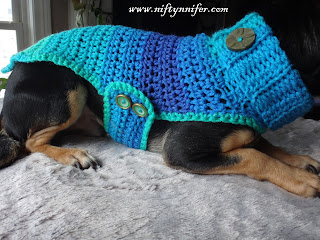
Free Crochet Pattern ~Chihuahua Sweater

http://www.niftynnifer.com/2018/01/free-crochet-pattern-chihuahua-sweater.html

Introducing my little model, Gizmo. Gizmo is my Dear Head Chihuahua. He is approximately 1 1/2 years old. 
      Last night I sat up in bed working on a crochet sweater to fit this little guy. He enjoys it so much that he fell asleep while I took his picture. 

http://www.niftynnifer.com/2018/01/free-crochet-pattern-chihuahua-sweater.html

My Chihuahua's Measurements
Chest = 15 1/2 inches.
Neck = 10 1/2 inches.
Waist 12 1/2 inches.
Shoulder blades to base of tail = 14 inches.
You can try this project on your chihuahua as you work.


Materials Required:
4.5mm Crochet hook.
Row markers.
Darning needle.
Red Heart Super Saver Stripes Yarn. Medium 4. Colour Cool Stripe.
2X 1 inch buttons.
1 Larger button (optional for collar).

Gauge:
Using a measuring tape
Approximately 4 rows = 2 inches.
Approximately  6 hdc = 2 inches.
I measured my gauge on body of finished project.
I've included some measurements along the way.

Special Abbreviations:
Ch = Chain.
Sc = Single Crochet.
Ea = Each.
St(s) = Stitch(es).
Mnr = Mark New Row/Round.
Rnd(s) = Round(s).
Beg = Beginning.
Ss = Slip Stitch.
Hdc = Half Double Crochet.
Bl = Back Loop.


Instructions:
Starting with the collar.
Row 1: Ch 20. Turn. Hdc in 2nd ch from hook. Hdc in ea ch across. (19hdc)
Rows 2-18: Ch 2. Turn. Hdc in ea bl across, forming 'hills and valleys'. (19hdc)
Collar should measure approximately 5 1/2 inches X 10 inches.

Fold project in half, lining row 1 evenly up to row 18. Evenly ss through bl of both rows at same time, forming a tube (collar). 
http://www.niftynnifer.com/2018/01/free-crochet-pattern-chihuahua-sweater.html

Working right to left, ss 6 times across to next 'hill'.

The Body:

Monday 15 January 2018

Free Crochet Pattern ~Cheeky Little Monkey Hat & Scarf

http://www.niftynnifer.com/2018/01/free-crochet-pattern-cheeky-little_15.html

Materials Required:
3.5mm crochet hook.
Patons Grace Yarn. Light 3. Color: Sky.
Darning Needle (for sewing in ends).
Scissors.
Row/Round markers.

2017 Hot Fingerlings Interactive Baby monkey


Guage:
Approximately 10 sc = 1 inch.
Approximately 6 rows = 1 inch.

Special Abbreviations:
Ch = Chain.
Sc = Single Crochet.
Ea = Each.
St(s) = Stitch(es).
Mnr = Mark New Row/Round.
Rnd(s) = Round(s).
Beg = Beginning.
Ss = Slip Stitch.
Hdc = Half Double Crochet.


http://www.niftynnifer.com/2018/01/free-crochet-pattern-cheeky-little_15.html

Instructions:

Hat:
Ch 2
Rnd 1: 6 hdc in 2nd ch from hook. (6hdc)
Rnd 2: Hdc to join. Mnr. Hdc in same st. 2 hdc in ea st around. (12 hdc)
Rnd 3: Hdc to join. Mnr. Hdc in same st. 2 hdc in ea st around. (24 hdc)
Rnds 4-5: Hdc to join. Mnr. Hdc in ea st around. (24 hdc)
Rnd 6: Hdc to join. Mnr. Hdc in ea st around. Ss to join. Fasten Off. Sew in ends.(24 hdc)


Add a pompom to the top of the hat. You can make your own using the following video (using only 2 fingers) or purchase one. Sew it on.


Scarf
Row 1: Ch 35. Hdc in 2nd ch from hook. Hdc in ea st across. Fasten off. Sew in ends. (35 hdc)

http://www.niftynnifer.com/2018/01/free-crochet-pattern-cheeky-little_15.html


Saturday 13 January 2018

Free Crochet Pattern ~Cheeky Little Monkey Blanket & Pillow

http://www.niftynnifer.com/2018/01/free-crochet-pattern-cheeky-little.html

I bought my daughter this Fingerling/Happy Monkey for Christmas and she fell in love with him instantly. He is an interactive little monkey that holds onto your finger, makes silly noises when he swings by his tail. He blows back kisses and snores. Now he can snuggle up with his new blanket and pillow and snore happily.
This pattern was fun to make up and didn't take very long to make, using mostly half double crochet(hdc) and single crochet(sc) stitches. My daughter played for hours after I completed this project.

Materials Required:
3.5mm crochet hook.
Patons Grace Yarn. Light 3. Color: Sky.
Darning Needle (for sewing in ends).
Scissors.
Row/Round markers.
Cotton Stuffing.

2017 Hot Fingerlings Interactive Baby monkey


Guage:
Approximately 10 sc = 1 inch.
Approximately 6 rows = 1 inch.

Special Abbreviations:
Ch = Chain.
Sc = Single Crochet.
Ea = Each.
St(s) = Stitch(es).
Mnr = Mark New Row/Round.
Rnd(s) = Round(s).
Beg = Beginning.
Ss = Slip Stitch.
Hdc = Half Double Crochet.


Instructions:

Blanket
Ch 25
Row 1: Hdc in 2nd chain from hook. Hdc in ea ch across. (24hdc)
Rows 2-13: Ch 2. Turn. Hdc in ea st across. (24hdc)
Border
Round 1: Ch 1. Turn. Sc in ea st around, placing 2sc in ea corner st. Ss to join. Fasten off. Sew in ends. (102sc)

Pillow
Ch 16
Row 1: Hdc in 2nd chain from hook. Hdc in ea ch across. (15hdc)
Rows 2-13: Ch 2. Turn. Hdc in ea st across. (15hdc)
Border
Fold project in half. Pin corners together.
http://www.niftynnifer.com/2018/01/free-crochet-pattern-cheeky-little.html

Round 1: Ch 1. Turn. Working through both sides of folded project. Sc in next st. Sc in ea st around, placing 2sc in ea corner st, and leaving a few sts unworked. Stuff the pillow with a bit of cotton. Sc in remaining sts around. Ss to join. Fasten off. Sew in ends. 


Sunday 29 November 2015

Crochet Pattern Review ~Butterfly Garden Afghan Block

http://www.niftynnifer.com/2015/11/crochet-pattern-review-butterfly-garden.html
First of all ~ Get your free copy of this fantastic and fun crochet pattern here.
The Crochet Butterfly Afghan Block is designed by Dearestdebi. Be sure to like her on Facebook to keep up to date with her current designs. 


I recently had the pleasure to test out this amazing pattern.
Using yarn from my stash, and armed with a 6.5 mm hook I plugged away at this wonderful creation by Dearestdebi.
I used a variety of yarns so my square turned out larger than Debi's. I know when I make more of these squares I would love to try using the yarns she has listed in her patterns. Like many others, I am trying to use up some of my ever growing yarn stash.

Craftsy

This pattern is extremely well written and includes great photos to help with construction. Debi did a fantastic job designing this pattern, as she always does. 
To be able to create something so beautiful takes a beautiful mind, patience and alot of time. It is truly a labour of love that you too can create in only a few hours. Seriously! I finished mine in less than a day, while my kidlets were away at school. I took breaks. Lots of breaks, but if I were to time it, it would have been under 3 hours.

My daughter absolutely loves the little butterflies that hover over the flowers in this garden of roses. She had a friend over the other day that was amazed by the beautiful design. She begged me to make one for her dolly. Wouldn't that be a fabulous Christmas gift? I personally would love to make a pillow with this one. It would look great alongside my Twist & Shake Square Pillow that I created using my Twist & Shake Square.


http://www.niftynnifer.com/2015/11/crochet-pattern-review-butterfly-garden.html


Do you love this pattern as much as I do?
Check out this Free Pattern Here!


Are you are feeling super inspired? Check out all her beautiful patterns!
See more of Debi's patterns on Ravelry.
Animated Social Gadget - Blogger And Wordpress Tips